RED Brushes
CSG brushes make up the geometry of each Red Faction level. Generally, level designers will create at least the basic layout of their map with brushes before moving on to placing objects or developing scripted sequences. Level design in RED is somewhat unique in the arena FPS genre due to GeoMod technology. Because GeoMod uses the boolean carve operation, it is only possible to blow craters in level geometry - this leads to Red Faction levels generally relying far more on BSP brush geometry for tasks that other engines may turn to static meshes for. Because of this, brushwork in RED tends to be much more flexible and reliable than in some other engines, which also enables level designers to create the majority of their level in the editor itself, rather than relying on 3d editing software for much of their custom geometry as is the case in many other engines.
In short, the GeoMod engine was designed for BSP brushes to be the primary tool in creating environments.
In RED, brushes are used for the following purposes:
- Base level geometry - rooms, walkways, ramps, stairs, etc.
- Geometry within moving groups
- Structural support geometry (that isn't affected by GeoMod)
- Grating and fencing
- Breakable and bulletproof glass
- Portals
Basic Brushwork Concepts
It is always good to have an idea of what you want your level to be before you start. It is even more helpful to sketch out the important parts that you know you would like to have in your level, or the entire layout. You could also use pictures of existing structures that you feel would make for an interesting game environment. Don’t expect to create something incredible in your first attempt, especially if you’ve not used a level editor before. Take some time to acclimate yourself to the commands, options and general functionality of the editor. Reading through the RED Functionality Overview makes starting much simpler.
Air brushes are most likely the first kind of brush you will create when building a level. You will generally start by carving out an area because the RED world is a solid. With planning, you can create a large portion of your level using carefully placed air brushes. Creating the rooms of a level mostly out of air brushes yields better results when it comes time to create rooms.
Solid brushes should be use when you need to add structural details or build objects within a room. Solid brushes will still boolean with other brushes and can be "cut into"(booleaned) by air brushes.
A brush’s placement in time relative to the other brushes in a level affects how the level will look when built. For example, building a solid brush then an air brush room around the solid brush will result in a missing solid. Why? Because a brush is booleaned into the level in the order it was placed. So, the engine will build the solid brush, then build the air brush, cutting away a section (or all) of the solid. This problem can be remedied using the Start of Time and End of Time buttons.
Rooms
Brush Shapes
Brushes are created in Brush Mode. When creating a new brush, the first and most important decision a level designer makes is the shape of the brush. The following shapes are available:
Box
Cone
Cylinder
Face
Mesh
- Mesh Name: Mesh to load.
- Browse: Browse for a .v3m mesh to load as a brush.
Sphere
Wedge
Brush Types
Brush types are configured in the Brush Properties panel at the bottom of the Brush Mode panel view. The available options are Is Portal, Is Detail, Emits Steam, and Life. Click Update to apply the selected flags to the selected brush.
Brush type guidelines:
- Only air brushes or Face shape solid brushes can be portal brushes
- Only solid brushes can be detail brushes - selecting the Is Detail flag on an air brush has no effect
- Only Face shape detail brushes can have a Life value
- Only solid detail brushes should emit steam (usually used for pipes)
- Only solid brushes should be added to moving groups - air brushes technically can be added, but they will behave very strangely
Portal Brushes
Detail Brushes
Detail Brushes are solid brushes that no longer interact with other brushes in the level through boolean operations. This means that when the level is compiled, the detail brush will not be changed by brushes that are later in time. This also means that the brush will not be changed through geomods in the course of game play. Detail brushes are typically used for things like substructures (such as reinforcement beams) that are buried within a solid portion of a level, only to be revealed with a Geomod.
Detail brushes must be solid. If an air brush is designated as a detail brush, it will have no effect.
Detail brushes (normally detail face brushes) are the only brushes that can have transparent textures. This is useful in creating glass, grating, sky cloud planes, and invisible faces.
Detail brushes can also be used to keep a player from geomodding through an area. The detail brush in this instance can be visible to the player, or can be inside another brush. When the player geomods that area, the detail brush will be visible within.
One thing to take note of is that all of the faces of a detail brush are rendered, meaning they will impact framerate unless textured with an Invisible Texture. Therefore, if you have faces on detail brushes that the player will never see, it is a good idea to texture them with an Invisible Texture. Some examples of this would be detail brushes that meet together at a seam, detail brushes that the player can never get to one side of, and so forth. Read the section below for more information on invisible geometry.
Invisible Geometry
The use of Invisible textures in a level is very important. Invisible textures will always block the player and other entities but will not affect weapons fire. Projectiles will go right through them. Invisible geometry is created in the editor by applying one of 4 special textures to a brush face. All of these textures are in the "Effects" directory and have the word "invisible" in their file name. There are invisible textures for the four main material types - rock, metal, cement, and solid. Generally, you should only apply invisible textures to faces on detail brushes and movers. Invisible faces will always show up in the editor but are not rendered in-game. They do count towards a level's total face count in the editor but since they are not rendered in-game, they are not added to the overall face count in-game. Careful use of invisible textures will help frame rate in almost any level. You should use Invisible textures wherever possible. If the player will never see a particular face, put an invisible texture on it. For example, the top and bottom faces of a door or the the bottom of a girder that goes into the ground deeper than the player can geomod to.
Additionally, you should use invisible geometry to smooth out collision whenever possible. If you make stairs, you should definitely use invisible face brushes as a "ramp" so the player doesn't "bump" as they go up each step. The images below are examples of Invisible Faces being used to smooth out collision in levels.
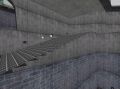
Invisible face to smooth out a ramp
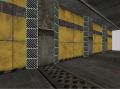
Invisible face to smooth out collision with detail on a wall


Breakable Glass
Breakable glass is created by means of a face shape solid detail brush with a configured Life value and textured with a glass texture. Breakable glass is the only instance where the Brush Mode Life parameter should be used - it will cause strange behavior if used otherwise.
Some tips for creating breakable glass:
- Breakable glass brushes must always be 4-sided face shape solid detail brushes
- Each breakable glass brush must not intersect another breakable glass brush - if they do, when one breaks, the other will disappear instantly
- You should always use glass material textures for breakable glass to maintain a realistic appearance - breakable glass textures use the prefix gls whereas unbreakable glass textures use sgl
Steam Emitting Brushes
If you tick the Emits Steam flag, a small steam particle emitter and ambient sound will be created when the brush is penetrated by a bullet or projectile from a weapon with a penetration value (like the Rail Driver). Only detail brushes should use this flag.
Steam emitting brushes are typically used to add a subtle but noticeable element of immersion to your levels. The standard use for steam emitting brushes is pipes, but they can also be used for other purposes. A single brush will only emit 3 steam jets at once - once the 4th is created, the 1st will be removed.
Editing Brushwork
Brushwork in RED can be edited via Brush Mode, Face Mode, and Vertex Mode. Aside from performing basic operations (move, rotate, scale) on brushes, faces, or vertices, the following RED tools can be used to edit brushwork: