FontTool2
FontTool2 is a standalone command-line utility used to convert properly-formatted .tga images into .vf font files for use in Red Faction.
Usage
Basic Usage
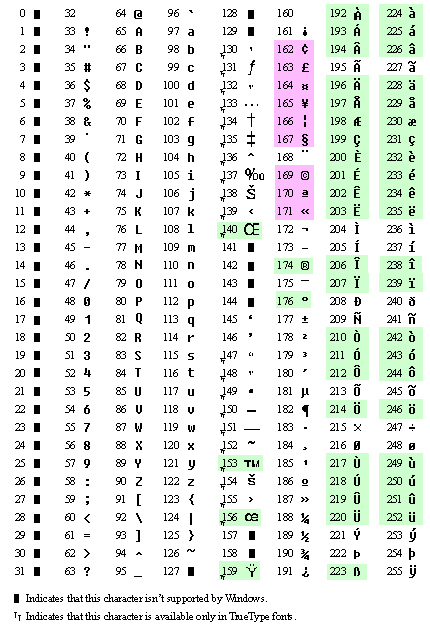
In order to create a source .tga, you will need a paint program that supports 32-bit images with an alpha channel (Photoshop, Paint Shop Pro, etc). The first thing to note is that Red Faction uses the ANSI character set, not ASCII. The set coding determines in what order characters appear in the “chart”. Here is a list of ANSI character codes, and their characters:
Red Faction fonts must start at the first entry, 32, which is the space character. The .vf files that ship with the game include every character from 32 to 126, and also any characters marked in green or violet in the above chart. Green characters are included as-is, while violet are used for special symbols and don’t match the characters shown in the above chart.
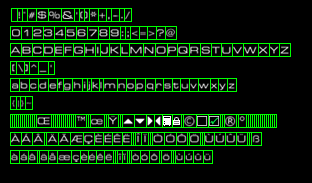
An example formatted source file is provided (rfpc-medium.tga) in the Official RF Toolkit. This example includes each character, starting from ANSI 32, through the diacritics characters needed for German and French, ending with ANSI 252. It looks like this:
Note that while there’s a “cell” for every character from 32 to 252, there isn’t a character in every cell. Some are empty, one-pixel wide slots. In your font, you can skip as many characters as you like, but you must include an empty cell for each of them. You can see the basics of how to create a font just by looking at the PSD file. Every character sits in a cell, every cell is made up of a 1-pixel, full green border.
Here are the basic rules for creating the source .tga:
- Cells must start with ANSI 32 (the space character), but can end on any ANSI cell.
- You must not skip cells. If you wish to not include a character, you need to include an empty cell for it, at least one pixel wide.
- The green borders that make up the cells must be one-pixel in width on all sides, and must be full green (0, 255, 0).
- Rows of cells can be broken anywhere, but at least one black pixel row must seperate each row of cells.
- All cells must be the same height.
- Cells can be varying widths, to match the size of each particular character. One black pixel should be included on the right side of each character. This extra space is what determines the default spacing, or “kerning” between that character and the next one.
- You must have an alpha channel. See “rfpc-medium.tga” for an example of how the alpha channel should be used.
- Non-black pixels in the alpha channel must not overlap the green border pixels in the RGB channels.
The example .psd, as it appears, is not ready to make a source .tga just yet. The way it’s shown is how it’s most easily edited, however, with layers for the black background, the characters, and the green borders.
Before saving it out as a .tga, copy the characters channel into the alpha channel, and floodfill the characters channel with full white. Since the alpha channel is what determines the actual shape of the characters, the RGB channels should be full intensity white (except the green borders) to make sure the characters are evenly colored. See rfpc-medium.tga for an example of how it should look.
Once you have the .tga saved out (use 32 bits, not 24), you’re ready to run it through FontTool2.
Open a command prompt window and go to your \fonttool2\ directory. Type the following:
fonttool2 FILENAME.tga
Where “source.tga” is the name of the .tga file you saved out. If everything worked, it should spit out a bunch of output, and end with something that looks like this:
If you get any sort of error message, something isn’t right with the source .tga. A common cause of errors is non-black alpha pixels underneath the green borders. If this occurs, or if your green borders aren’t connected correctly, it will give you coordinates where the problem is. Once things are straight, you’ll get a source.vf file (named however you named the .tga file). This is what the game actually loads.
Advanced Usage
Once you’ve played with making fonts, you may wish to change the kerning information. Kerning is what determines how far apart one character appears from the next. In proportional fonts like the ones seen in RF, some characters look too far from others unless you modify the kerning data. A good example of this is a T followed by a J. You may want to make the J overlap the T just a little.
Do edit the kerning data on your .vf file, go to your \fonttool2 directory and type:
fonttool2 FILENAME.vf
Where “source.vf” is the name of your .vf file. This will start the interactive kerner in FontTool2. With this you can alter the spacing between any two characters in your font, on a case-by-case basis. Instructions on how to use the interactive kerner should appear onscreen.


