Official RF Toolkit: Difference between revisions
| Line 231: | Line 231: | ||
Forces particle rendering even if the emitter is offscreen. It’s highly recommended that you keep this off, as enabling it is expensive. | Forces particle rendering even if the emitter is offscreen. It’s highly recommended that you keep this off, as enabling it is expensive. | ||
That’s basically it. If you have a VParticle emitter selected during a [[.vfx]] file export, all the parameters will be written out into the [[.vfx]] file. Note, the “scale” and specific shape of particle emissions will vary a bit from Max to RF. Some tweaking of values is often necessary. | That’s basically it. If you have a VParticle emitter selected during a [[.vfx]] file export, all the parameters will be written out into the [[.vfx]] file. Note, the “scale” and specific shape of particle emissions will vary a bit from Max to RF. Some tweaking of values is often necessary. | ||
Revision as of 19:10, 4 November 2020
The Official RF Toolkit is a collection of standalone utilities and 3ds max plugins used to create content for Red Faction. These are some of the same tools used by Volition in the creation of the game.
You can download the Official RF Toolkit here: [Download]
CCrunch
Captain Crunch (CCrunch) is a standalone command-line utility included in the Official RF Toolkit that does three things:
- converts .v3d files into .v3m files (Static Meshes)
- converts .vcm files into .v3c files (Skeletal Meshes)
- creates .vpp packfiles out of regular datafiles
Usage
Static Meshes
Static mesh files exported from 3ds Max via the RF Toolkit Plugins are .v3d files. These need to be converted into .v3m files before Red Faction can load them.
The command-line syntax for this conversion is:
ccrunch.exe FILENAME.v3d
Where FILENAME is the relative path & filename of your .v3d file. If you specify no path, it will assume the same directory you’re running it from. The resulting .v3m file will be placed in the same directory as the source file. The output spew for this process is confusing at best, but if it created the file and you don’t see the word “ERROR” anywhere in the spew, you’re good to go.
Skeletal Meshes
Skeletal meshes are used for characters and first person weapons. They are exported from 3ds Max via the RF Toolkit Plugins are .vcm files. These need to be converted into .v3c files before Red Faction can load them.
The command-line syntax for this conversion is:
ccrunch.exe FILENAME.vcm
Where FILENAME is the relative path & filename of your .vcm file. If you specify no path, it will assume the same directory you’re running it from. The resulting .v3c file will be placed in the same directory as the source file. The output spew for this process is confusing at best, but if it created the file and you don’t see the word “ERROR” anywhere in the spew, you’re good to go.
VPP Packfiles
.vpp packfiles must be used for any data modification in Red Faction PC. This goes for levels, .tbl files, models, textures, everything. If it’s not inside a .vpp file, the game will not recognize it.
Building .vpp packfiles with CCrunch is pretty straightforward. The command-line syntax is like so:
ccrunch.exe <output VPP filename> <input TXT filename>
A text file list of individual files to include in the .vpp must be specified. You can make the .txt file with Notepad, or any other text editor. A sample .txt input file might look like this:
data\effects\lights\LightBeam02.tga
data\maps\skins\enviro_guard_face_b-mip1.tga
data\levels\single\L11S3.rfl
data\levels\single\L12S1.rfl
data\audio\music\ambience\*
data\audio\music\game\*
data\audio\music\menu\*
One file per line. The pathname must be relative to the directory you run CCrunch from. Note, wildcards are permitted, as shown in the “music” lines above. This feature of CCrunch is designed for massive, automated .vpp building. If you're only packing a few stray files, it might be better to use one of the other RF Tools.
MakeVBM
MakeVBM is a standalone command-line utility used to create .vbm files for use in Red Faction 1. These are animated or single-frame 2D bitmaps, in a proprietary Volition format. Volition's MakeVBM program is included in the Official RF Toolkit.
In 2020, rafalh released his own completely rewritten version of MakeVBM, which adds many enhanced features over the original. This enhanced tool uses the same syntax as the Volition tool, adds additional functionality, and retains all functionality of the original.
Key improvements in rafalh's enhanced MakeVBM are:
- Support for high resolution image files
- Support for many common image formats as input (.jpg, .png, .dds, etc.), rather than only .tga like the Volition tool
Usage
The source input for MakeVBM is one or more image files, either 24 or 32 bit with alpha, in a supported image file format. A list of supported image file formats is available here.
The first step is to get your image files in one place, and name them correctly. MakeVBM requires sequences to be named like so:
name-0000.tga
name-0001.tga
...
and so on.
“name” can be any prefix you like, but it must be followed by the “-XXXX” ending. Once you have your files together, decide what color format your VBM will use.
While all VBMs use 16 bits of color, that 16 bits can be broken down several ways. The output VBMs can be in one of four color formats. The numbers represent the ARG and B channels (alpha, red, green, and blue).
| 4444 | 4 bits for each RGB channel, 4 bits for alpha. Use this format when you want a full, varied alpha channel with semi-transparency. |
| 1555 | 5 bits of color for the RG and B channels, 1 bit for alpha. Use this when you have alpha, but it’s only the “on/off” variety. Pixels are either totally opaque or totally transparent. Useful largely for interface art. |
| 565 | 5 bits of alpha for the R and B channels, 6 bits for Green, and zero for alpha. Use this when the image needs no alpha transparency at all. |
Next, decide what framerate the animation will need, measured in frames-per-second.
When you’re ready, open a command prompt window, make sure “makevbm.exe” is on your path, and go to the directory where your frames are located. Then type:
makevbm <colormode> <framerate> <prefix>.tga
Where <colormode> is either 4444, 1555, or 565, <framerate> is an integer like 15 or 30, and <prefix> is the first part of your sequence filenames, minus the “-XXXX” suffix.
The Red Faction invulnerability overlay effect is a .vbm using 565 color mode at 8 frames per second. To create that file from its frames, I would type:
makevbm 565 15 pow.tga
This would create “pow.vbm”, which the game can now use.
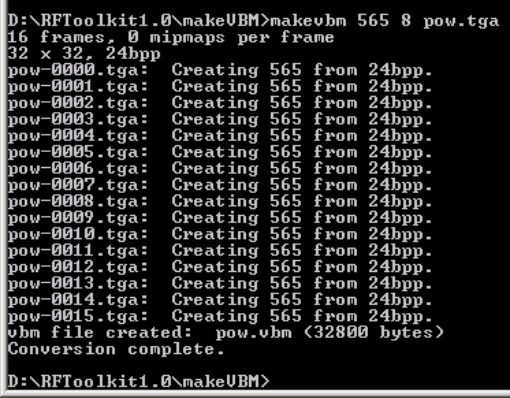
When everything is run correctly, the output spew looks like this:
FontTool2
FontTool2 is a standalone command-line utility used to convert properly-formatted .tga images into .vf font files for use in Red Faction.
Usage
Basic Usage
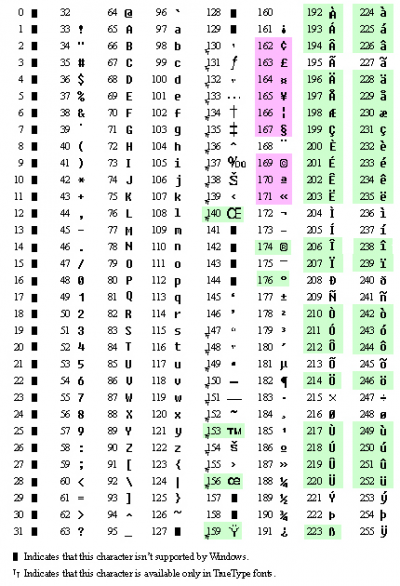
In order to create a source .tga, you will need a paint program that supports 32-bit images with an alpha channel (Photoshop, Paint Shop Pro, etc). The first thing to note is that Red Faction uses the ANSI character set, not ASCII. The set coding determines in what order characters appear in the “chart”. Here is a list of ANSI character codes, and their characters:
Red Faction fonts must start at the first entry, 32, which is the space character. The .vf files that ship with the game include every character from 32 to 126, and also any characters marked in green or violet in the above chart. Green characters are included as-is, while violet are used for special symbols and don’t match the characters shown in the above chart.
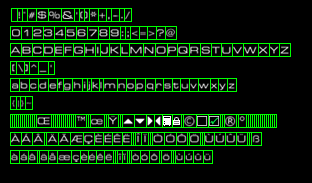
An example formatted source file is provided (rfpc-medium.tga) in the Official RF Toolkit. This example includes each character, starting from ANSI 32, through the diacritics characters needed for German and French, ending with ANSI 252. It looks like this:
Note that while there’s a “cell” for every character from 32 to 252, there isn’t a character in every cell. Some are empty, one-pixel wide slots. In your font, you can skip as many characters as you like, but you must include an empty cell for each of them. You can see the basics of how to create a font just by looking at the PSD file. Every character sits in a cell, every cell is made up of a 1-pixel, full green border.
Here are the basic rules for creating the source .tga:
- Cells must start with ANSI 32 (the space character), but can end on any ANSI cell.
- You must not skip cells. If you wish to not include a character, you need to include an empty cell for it, at least one pixel wide.
- The green borders that make up the cells must be one-pixel in width on all sides, and must be full green (0, 255, 0).
- Rows of cells can be broken anywhere, but at least one black pixel row must seperate each row of cells.
- All cells must be the same height.
- Cells can be varying widths, to match the size of each particular character. One black pixel should be included on the right side of each character. This extra space is what determines the default spacing, or “kerning” between that character and the next one.
- You must have an alpha channel. See “rfpc-medium.tga” for an example of how the alpha channel should be used.
- Non-black pixels in the alpha channel must not overlap the green border pixels in the RGB channels.
The example .psd, as it appears, is not ready to make a source .tga just yet. The way it’s shown is how it’s most easily edited, however, with layers for the black background, the characters, and the green borders.
Before saving it out as a .tga, copy the characters channel into the alpha channel, and floodfill the characters channel with full white. Since the alpha channel is what determines the actual shape of the characters, the RGB channels should be full intensity white (except the green borders) to make sure the characters are evenly colored. See rfpc-medium.tga for an example of how it should look.
Once you have the .tga saved out (use 32 bits, not 24), you’re ready to run it through FontTool2.
Open a command prompt window and go to your \fonttool2\ directory. Type the following:
fonttool2 FILENAME.tga
Where “source.tga” is the name of the .tga file you saved out. If everything worked, it should spit out a bunch of output, and end with something that looks like this:
If you get any sort of error message, something isn’t right with the source .tga. A common cause of errors is non-black alpha pixels underneath the green borders. If this occurs, or if your green borders aren’t connected correctly, it will give you coordinates where the problem is. Once things are straight, you’ll get a source.vf file (named however you named the .tga file). This is what the game actually loads.
Advanced Usage
Once you’ve played with making fonts, you may wish to change the kerning information. Kerning is what determines how far apart one character appears from the next. In proportional fonts like the ones seen in RF, some characters look too far from others unless you modify the kerning data. A good example of this is a T followed by a J. You may want to make the J overlap the T just a little.
Do edit the kerning data on your .vf file, go to your \fonttool2 directory and type:
fonttool2 FILENAME.vf
Where “source.vf” is the name of your .vf file. This will start the interactive kerner in FontTool2. With this you can alter the spacing between any two characters in your font, on a case-by-case basis. Instructions on how to use the interactive kerner should appear onscreen.
MVFReduce
MVFReduce is a tool that reduces the amount of keyframes in .mvf animation files. It doesn’t remove all of them, but it removes keys along a curve that aren’t necessary. It’s necessary to use MVF Reduce, as animation files can get large and won’t always fit into memory. MVF Reduce works by replacing adjacent keyframes that are "similar" to one another with a single keyframe. Adjacent keyframes that are within a certain tolerance limit of one another are considered "similar" and can therefore be merged.
Usage
Copy mvfreduce.exe into the directory containing your .mvf file(s), then open a command prompt window and run the following command:
mvfreduce -m MORPHREDUCTION –d ROTATIONREDUCTION –e POSITIONREDUCTION FILENAME.mvf
- -m : (Optional) Float value as input, determines the keyframe reduction of morphing vertices. The lower this number, the less reduction is applied. Defaults to .005 if no float input value is provided.
- -d : Float value as input, determines the rotational keyframe reduction. The lower this number, the less reduction is applied. Volition's recommendation is to use .00007, unless it is necessary to reduce more to fit into memory.
- -e : Float value as input, determines the positional keyframe reduction. The lower this number, the less reduction is applied. Volition's recommendation is to use .00007, unless it is necessary to reduce more to fit into memory.
- -a : (Optional) If you don't want to specify a specific .mvf filename to apply the reduction to, you can instead use the -a switch to apply the specified reduction to all .mvf files in the current directory.
NOTE: Do not run MVFReduce twice on the same file, as it will reduce an already reduced file. Re-export the animation file first.
3ds Max Plugins
- NOTE: All included 3ds Max plugins require version 4.2 or 5.x of 3ds Max. They will not work on earlier or later versions.
VBMImporter
VBMImporter allows 3ds Max to read and display .vbm bitmap files. When you install this plugin, you'll get a VBM Importer (*.vbm) option in any 3ds max dialog that takes bitmap files as input. You can use this to assign .vbm bitmaps directly to models through the Material Editor. Animated .vbm files will correctly animate in the Material Editor as well.
Installation:
- Copy VBM_importer.bmi into the plugin directory. Example: “\3dsmax4\plugins\”
- Make sure this directory is in your plugin paths for Max. Check this in Max under Customize/Configure Paths/Plugins/
- Restart 3ds Max
VParticle
VParticle adds a new Particle emitter type to 3ds mMx, called VParticle. This plugin is solely for use in .vfx files used in Red Faction. It’s not fully supported as a standard “renderable” particle type in 3ds Max, so do that at your own risk.
Installation:
- Copy vparticle.dlo into the plugin directory. Example: “\3dsmax4\plugins\”
- Make sure this directory is in your plugin paths for Max. Check this in Max under Customize/Configure Paths/Plugins/
- Restart 3ds Max
You can find the VParticle object under the Create panel, in the Geometry/Particle Systems category. Create it just like any other 3ds Max emitter.
The supported parameters for VParticle appear in its Modify dialog, just like other emitters. Most of the parameters are self-explanatory, or match those of other Max emitters. The VParticle-specific stuff is as follows:
Drops/Facing
These are the two types of VFX particles supported by Red Faction. Facing is the default type, and uses camera-facing bitmaps onscreen. Drops are untextured, triangular shapes used for sparks, water drops, etc. Unlike other VFX objects, Drop particles do not require a texturemap in their Diffuse channel. Instead, the material’s Diffuse color is used.
Tail Distance
Used only for Drop particles. Determines how “long” each drop is.
Shrink at birth
When set above 0.0, causes particles to “grow” from nothing, reaching full size at the frame indicated by this percentage multiplier value. Example: particle life is set at 30, and Shrink at Birth is set to 0.2. From frame 0 to frame 6, the particles will grow from size zero up to the size specified in Particle Size, reaching full size at frame 6.
Shrink at death
Same as Shrink at Birth, but operates at the end of the particle’s life.
Fade at Birth/Death
Similar to Shrink at Birth/Death, but causes the particle’s opacity to fade in/out based on the timing values. Unless the Shrink values are used as well, particle size is not affected by this.
Fast Particles
When enabled, tells the game to use the more optimized “fast particle” system instead of the default particle renderer. This was largely a feature for the PlayStation 2 version of RF, and has little effect on the PC renderer. Some options my be unavailable/greyed-out when this is enabled.
Apply Gravity
When enabled, does automatic gravity on the emitted particles, along the global “down” axis in Max.
Randomize Orientation
Randomly orients each particle’s bitmap, to prevent strobing. Only supported for Facing particle types.
No Cull
Forces particle rendering even if the emitter is offscreen. It’s highly recommended that you keep this off, as enabling it is expensive.
That’s basically it. If you have a VParticle emitter selected during a .vfx file export, all the parameters will be written out into the .vfx file. Note, the “scale” and specific shape of particle emissions will vary a bit from Max to RF. Some tweaking of values is often necessary.
See VFXExporter for more information on exporting .vfx files.


