Nanoforge basics: Difference between revisions
m (→Siege Targets) |
|||
| Line 214: | Line 214: | ||
==Siege Targets== | ==Siege Targets== | ||
# Open a siege map in one tab, open a regular map with the same objects in another tab | # Open a siege map in one tab, open a regular map with the same objects in another tab. | ||
# Deep clone the siege target to the regular map | # Deep clone the siege target to the regular map. | ||
# Move the added siege target to the exact same location as the existing matching object on the regular map | # Move the added siege target to the exact same location as the existing matching object on the regular map. | ||
# Disable all the gamemode flags for the added siege target except for "Spawn in Siege" including its children | # Disable all the gamemode flags for the added siege target except for "Spawn in Siege" including its children. | ||
# Delete all the children of the siege targets (usually spawns that will be outside the map since they were deep cloned from the siege map), after they are all deleted make sure to "orphan children" of the child to ensure it doesn't have ghost children | # Delete all the children of the siege targets (usually spawns that will be outside the map since they were deep cloned from the siege map), after they are all deleted make sure to "orphan children" of the child to ensure it doesn't have ghost children. | ||
# Disable the <code>Spawn in siege</code> flag on the matching original map object | # Disable the <code>Spawn in siege</code> flag on the matching original map object. | ||
# You need to update <code>mp_levels.xtbl</code> so the map is selectable in siege | # You need to update <code>mp_levels.xtbl</code> so the map is selectable in siege. | ||
# Ensure the siege target and its child have the persistent flag | # Ensure the siege target and its child have the persistent flag. | ||
# The <code>priority</code> property for the <code>Siege target</code> child determines which siege objects are unlocked to destroy, eg if you set it to <code>1</code> it would be the first target the attackers can destroy, you can have multiple targets unlocked by using the same number and if you wanted to have targets unlocked one at a time you would use <code>1</code>, <code>2</code>, <code>3</code> and so on. | # The <code>priority</code> property for the <code>Siege target</code> child determines which siege objects are unlocked to destroy, eg if you set it to <code>1</code> it would be the first target the attackers can destroy, you can have multiple targets unlocked by using the same number and if you wanted to have targets unlocked one at a time you would use <code>1</code>, <code>2</code>, <code>3</code> and so on. | ||
# You must use an existing string in the game for the <code>display_name</code> property on the child or the map will crash. | |||
# If you mess up the offset of the child the map will crash. | |||
==Backpack Racks== | ==Backpack Racks== | ||
Revision as of 15:28, 2 May 2023
| This page is part of the Red Faction: Guerrilla Editing Knowledgebase | |
| Editing Main Page |
 |
This page is under construction. The information on this page may not yet be complete. |
This page goes over how to install Nanoforge and it's basic features. This article only goes over the basics of each feature. See the other guides for more detailed explanations.
Installation
Download
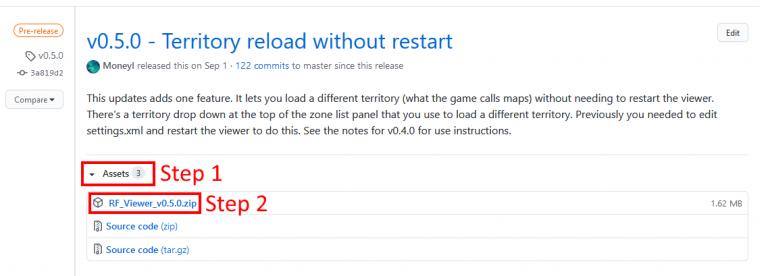
Nanoforge releases are posted on github. Multiple releases will be listed. You should always download the most recent release. To download it, look for the ▸Assets button(1), click it, and download the first zip file listed under it(2).
Install
- Unpack the zip file you downloaded anywhere and run Nanoforge.exe
- You should now see the start screen. On the left side it has the data path and the recent projects list. On the right it has the changelog. Nanoforge with attempt to auto detect your RFG install. If it says that your data path is invalid click the
Browse...button and select your RFG data folder.
Features
This section gives a quick rundown of each of Nanoforge's features.
Projects
Nanoforge uses projects to track edits made to game files. The idea is to use a single project per mod. You only need to create a project if you're editing files. You don't need one to view and export files. To create a new project click New project in the start page or File > New project... on the main menu bar. Fill out all the info on the popup and click Create. Below are each of the fields to fill in:
- Name: The name of the project. Used to name the project file and as the name in any modinfo.xml files it generates.
- Path: Path to the folder that the project should be created in.
- Description: (Optional) Description of what the mod is. Used in the description field of modinfo.xml.
- Author: (Optional) Author(s) of the mod. Used in the author filed of modinfo.xml.
- Create project folder: If unchecked then the project files are placed directly in the folder chosen for path. If checked a folder with the entered name will be created in that folder.
File explorer
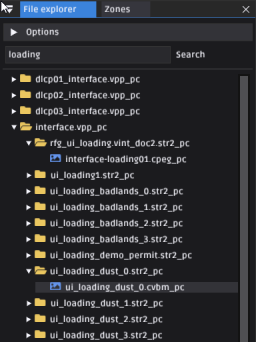
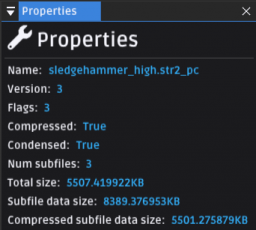
The file explorer lets you view the contents of vpp_pc and str2_pc files without extracting them manually. You can double click supported file formats like textures to open them. If you single click a vpp_pc or str2_pc file it will expand to show it's contents. Extra info about the file will be shown in the properties panel for some files when single clicking them.
Search
You can use the search bar to limit which files are shown in the file explorer. By default it will only show files with names that contain the search term. You can also use some special characters to specialize your search behavior:
- Start your search with *: Will only show files with names that end with whatever comes after *
- End your search with *: Will only show files with names that start with whatever comes before *
If you prefer regex you can check the regex search option. Note that the regex search option is much slower than the default one.
Properties panel
The properties panel sometimes will show additional info about files selected in the file explorer. It also may be used by other UI panels to show additional info. For example, it can list object properties when viewing territories (see map viewing section below).
Textures
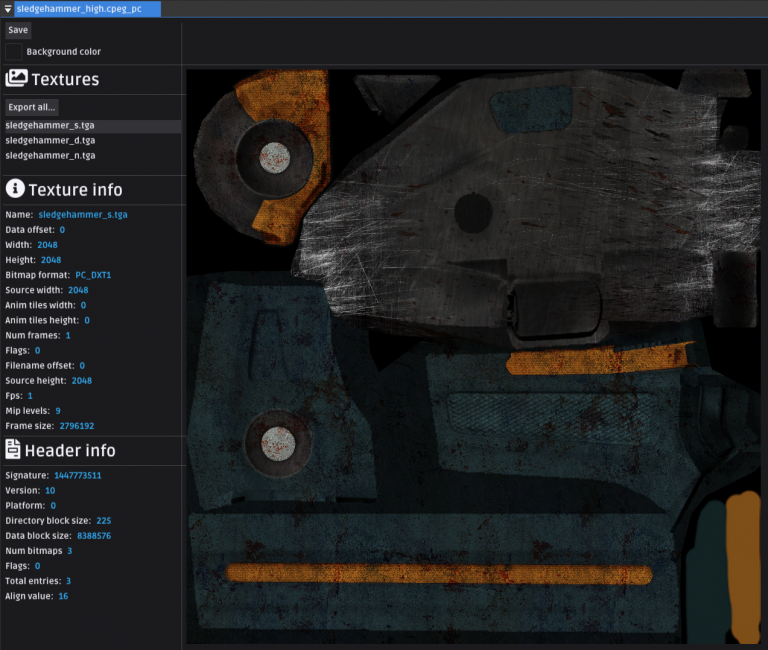
You can open texture files by double clicking them in the file explorer. Textures are split into two files. Either a cpeg_pc and gpeg_pc file pair or a cvbm_pc and gvbm_pc file pair. You can double click any of these to open a texture. A single RFG texture file can contain multiple textures, which we'll refer to as subtextures. Info about the selected subtexture will be shown below the subtexture list.
Above is an example of what you might see if you open a texture file. On the sidebar to the left there a few things, in order:
- The subtexture list. Click on one to see more info about it below.
- Texture info. This is info about the selected subtexture.
- Header info. This is general info about the cpeg/cvbm file.
Exporting textures
Textures can be exported to files you can edit with common image editors like Paint.NET, GIMP, or Photoshop. Currently textures can only be exported as .dds files. You can export single subtextures by right clicking one of them and clicking Export.... You can export all subtextures at once with the Export all... button.
Editing textures
Textures can be edited by imported textures you've edited externally. Currently it can only import .dds files. You do this by right clicking a subtexture, clicking Replace... and selecting the file you want to replace the subtexture with. Once you do this it's critical that you press the Save button above the subtexture list to save your edit. This edit will be automatically saved to your current project when you click Save. See Nanoforge Texture Editing for more info.
Meshes
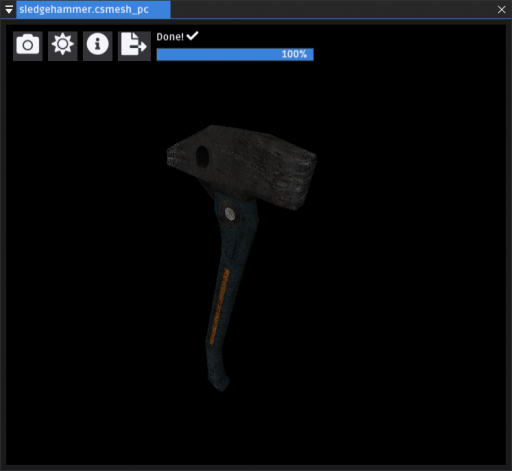
Nanoforge supports viewing and exporting .csmesh_pc (static mesh) and .ccmesh_pc (character mesh) files. Just like textures, meshes consist of two files. Every csmesh_pc file is paired with a gsmesh_pc file, and every ccmesh_pc file is paired with a gcmesh_pc file. You can click any of them to open a mesh. When you open a mesh you'll first see a blank space. Meshes are loaded on a background thread so it may take a few seconds for the mesh to be loaded and for it's textures to show up. Before its textures are found or if the textures cant be found you might see textures from previously loaded meshes applied to the mesh.
Above is what you might see if you open a mesh file. There's a few parts of the UI to note, in order:
- The camera button. This lets you control camera settings like speed and location. You can move the camera by holding down the right mouse button and using WASD to move around. If this doesn't work try left clicking on the mesh 3D view. Only the most recently selected mesh reacts to camera controls so if you have several open it'll only move one camera.
- The scene button. This has some rendering settings for the mesh such as scale and lighting color/intensity.
- The info button. This shows some additional info about the mesh such as vertex format, and the LOD slider for meshes with multiple levels of detail.
- The export button. This lets you export the mesh and it's textures to a .obj file, which can be imported into tools like blender.
- The status bar. This shows the loading status and percentage. It will show
Done! ✓once loading is complete.
Exporting meshes
To export a mesh:
- Wait for it to finish loading. The status bar will show
Done! ✓and 100%. - Click the export button. Top left of the document, button furthest to the right.
- Select a folder to export the mesh and it's textures to and click
Export.
A single gltf file and the meshes textures will be exported. Each lod level is labelled in the gltf under their own subnode. Currently these gltf files don't look right as is when imported into Blender. This is because GLTF uses a different rendering model than RFG. Typically meshes have a diffuse, specular, and normal texture. Their names end with _d, _s, and _n respectively. You'll need to make the following changes to the textures in the Blender shading tab:
- Diffuse -> Set color space to linear, attach texture color to "Base Color" on the BSDF
- Specular -> Set color space to linear, attach texture color to "Specular" on the BSDF
- Normal -> Set color space to SRGB, attach texture color to "Normal" on the BSDF
In the near future an extension will be made to automatically patch the shader graph.
Camera movement
To move the camera hold down the right mouse button over the 3D view and use WASD to move around. Holding down shift while moving will cause the camera to move faster. Pressing Q and E will move the camera directly up and directly down respectively.
Mod packaging
Once you're done editing textures you can use Nanoforge to repack the editing files and generate a modinfo.xml for you. To do this, simply click File > Package mod on the main menu bar. Once it's done go to the "Output" folder inside your project folder to see the modinfo.xml and any files that it relies on. These are ready for use with the re-mars-tered mod manager. RFG steam edition support will come in a future update.
Map view
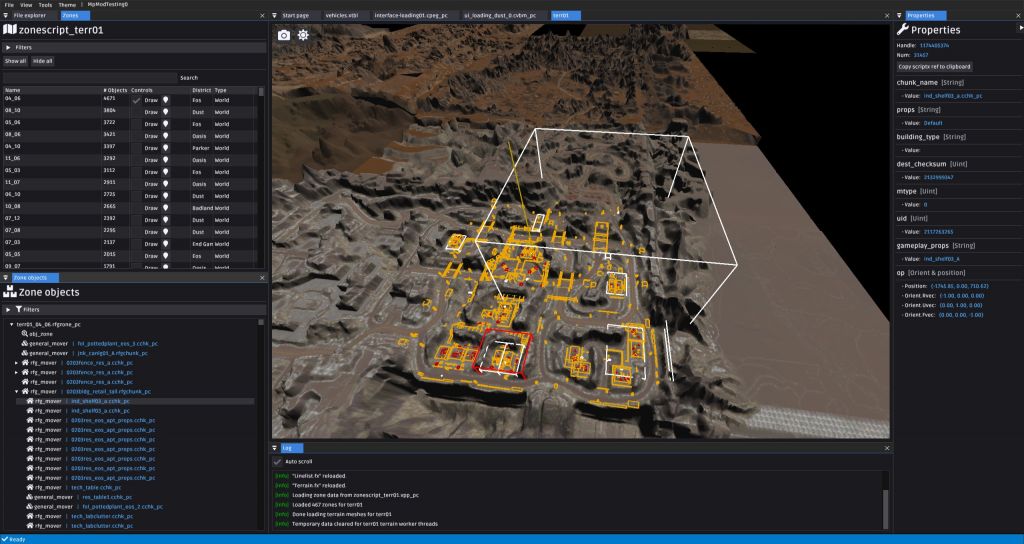
Nanoforge has partial support for viewing maps like the main campaign map. We'll be referring to them as territories as that's how RFG groups together many zones. See RF:G Map organization for more details on how RFG maps are structured. To open a territory via Tools > Open territory on the main menu bar. Terr01 is the main campaign map territory. A new document should appear when you open a new territory. Camera movement is the same as the mesh viewer. See camera movement. Terrain is loaded in the background so you'll see separate blocks of terrain pop into view as they load. Bounding boxes are drawn for zone objects. With a territory open you should see new information on the zone panel and the zone objects panel. You can dock panels by clicking and dragging on their titles. It's recommended that you dock the zone object list below the zone list so you can see both at once.
Below is an annotated image of information you can view about territories plus descriptions for each annotation.
- First, in the top left is the zone list. Territories are made up of one or more zones which in turn have many zone objects. Click a zone to see its object in the zone objects panel (bottom left). By default the zone with the most objects is selected. In this case that's
04_06. Note that each zone corresponds to a rfgzone_pc file. So, for example,04_06is really terr01_04_06.rfgzone_pc. - Next, bottom left is the zone objects list. This lists the objects inside the selected zone. Click an object to see its properties in the properties panel. Some objects have child objects, denoted by having a triangle in front of their name which you can click to expand them. You can filter objects by type inside the filters header. By default some very common objects like navpoints are hidden.
- Finally, in the top right is the properties panel. This shows the properties of the selected zone object.
Object Flags
- Flag 0 (Persistent): Unknown, any objects with this flag have a separate copy stored in a second rfgzone_pc file with its name prefixed with p__. So, for example, crescent has two rfgzone_pc files. mp_crescent.rfgzone_pc and p_mp_crescent.rfgzone_pc. The objects with the persistent flag are stored in both zone files, while objects without that flag are only stored in mp_crescent.rfgzone_pc. It's consistently used on player spawns and on most siege objectives.
- Flag 1: Unknown
- Flag 2: Unknown
- Flag 3: Unknown; might be related to how the game saves/loads map data from save files (requires more investigation)
- Flag 4: Unknown; seems to always get converted to the runtime flag
streaming_fixed, most rfg_movers and general_movers have this flag - Flag 5: Unknown; seems to get converted to the runtime flag
force_full_save - Flag 6: Unknown
- Flag 7: Unknown
- Flag 8: Spawns in Anarchy
- Flag 9: Spawns in Team Anarchy
- Flag 10: Spawns in CTF
- Flag 11: Spawns in Siege
- Flag 12: Spawns in Damage Control
- Flag 13: Spawns in Bagman
- Flag 14: Spawns in Team Bagman
- Flag 15: Spawns in Demolition
Chunk Flags
- Applies to
rfg_movers - When editing their properties in the inspector it's possible to change the
chunk_flags - You can also use
gameplay_properties.xtblto apply these flags and changegameplay_props. If you're using the Terraform Patch a gameplay prop namedInvulnerableis added which will make objects indestructible. - Eg:
dynamic_link invulnerablewill make the object indestructible. Full list of flags below. - child_gives_control: Unknown
- building: Unknown
- dynamic_link: Unknown
- world_anchor: Unknown
- no_cover: Unknown
- propaganda: EDF propaganda billboards you destroy for the achievement in singleplayer have this flag in
gameplay_properties.xtbl - kiosk:
tech_kiosk_EDF_Ahas this flag ingameplay_properties.xtbl - touch_terrain: Unknown, no
gameplay_properties.xtblentries use this flag and it's missing from the table description - supply_crate: EDF crates you destroy for the achievement in singleplayer have this flag in
gameplay_properties.xtbl - mining: Ores you mine for salvage and the achievement in singleplayer have this flag in
gameplay_properties.xtbl - one_of_many: Unknown,
windmill_0708,0102smokestack_86&0102smokestack_86_childhave this flag ingameplay_properties.xtbl - plume_on_death: Unknown
- invulnerable: Makes an object indestructible
- inherit_damaga_pct: Unknown
- regrow_on_stream: Unknown
- casts_drop_shadow: Object will cast drop shadows
- disable_collapse_effect: Unknown
- force_dynamic: Unknown
- show_on_map: Most objects in
gameplay_properties.xtbl. Most likely means the object will show on the minimap in singleplayer - regenerate: Unknown
- casts_shadow: Object will cast a shadow map
Object Info
obj_zone= Defines the wind speed, terrain file name & spawn_resource_data. If you move its location the terrain will no longer have collisionMPST= Multiplayer siege targetMPDCT= Multiplayer damage control targetshape_cutter= Causes object to start off with initial damage, used on damage control targets or maps like crash site, ruins & remnant where they put a hole in the wallspawn_node= Camera view at start of match and end of game. If a map doesn't have a least one of these it will crash.spectator_camera= Camera view but somehow different tospawn_nodesit might only be used if a player is spectating or during team gamemodes but this is untestedtrigger_region= Killbox that can be set to a mine or cliffrfg_mover= Buildings, backpack racks & moregeneral_mover= Explosive barrels and thebackpack_effect_attach.cchk_pcobjects for exampleplayer_start= Spawn point, can be set to Neutral, EDF or Guerillaitem= In multiplayer the bag for bagman is set toitem_type"multi_object_bagman_flag" and referencesitems_3d.xtblweapon= Weapon spawn,weapon_typedetermines which weapon will spawn and referencesweapons.xtblobject_effect= Visual effect, eg the fire on Nordic Bonusmulti_object_marker= Multiple uses, in multiplayer themarker_typecan be set toBackpack rack,Spawn node,Flag capture zone,King of the Hill target,Siege target&Spectator cameracover_node=navpoint= Probably where NPCs can navigate, similar to navmeshes in other gamesobject_action_node=object_squad_spawn_node= Probably where squads spawn and references varioussquads.xtblfilesobject_path_road= Probably where NPCs can drive vehiclesobject_guard_node=object_vehicle_spawn_node= Probably where vehicles can spawn like walkers found around the SP mapobject_bounding_box= Seems to be only be used in singleplayer, unknown whyobject_activity_spawn= Probably where you can start a side activity like demolition master for exampleobject_house_arrest_node= Related to the house arrest side activityobject_patrol= Probably where EDF patrolobject_dummy=object_mission_start_node= Probably where you can start a main missionobject_restricted_area= Probably where the EDF will attack on sight and you will get an alert level in SP
Object Properties
gameplay_propsreferencesgameplay_properties.xtblbackpack_typereferencesmp_backpacks.xtblweapon_typereferencesweapons.xtblitem_typereferencesitems_3d.xtblspawn_resource_datareferencesspawn_resource.xtblambient_spawnreferencesambient_spawn_info.xtblordlc01_ambient_spawn_info.xtblvisualreferenceseffects.xtblsoundreferencesfoley.xtbl(not included in the game for some reason) however there isdlc01_foley.xtbl
Spawn Points
mp_teamcan be set toNeutral,EDForGuerilla- When making a CTF map and you don't want players spawning at the opposing base ensure you disable the Flag
Spawn in CTFfor any Neutral spawn points - Unknown if the
respawnandinitial_spawnbooleans do anything in multiplayer indoorboolean is probably left over from Saints Row since all of RF:G is technically outdoors and no spawn points use this booleancheckpoint_respawn&activity_respawnare only used in singleplayer- Foward X axis (blue line) determines player spawn direction
Mover Types
- Applies to
rfg_movers - When editing their properties it's possible to change the
mtypefield to the corresponding numbers - Fixed = 0 (default)
- Normal = 1 (unknown)
- Lite = 2 (unknown)
- Ultra Lite = 3 (unknown)
- World Only = 4 (no collision but you can still destroy it with a hammer for example)
- No Collision = 5 (no collision)
Damage Control Targets
- Deep clone
MPDCT_MAPNAME_XXX - Move MPDCT_MAPNAME_XXX to the location of your choosing.
- In object properties for the parent change
display_nameto whatever you want your new damage control objective to be called. - If you're making a map that doesn't already have a damage control target you can open it in another tab and use the deep clone feature. If you're using the Terraform Patch the majority of Wrecking Crew maps will already have the asset along with all Siege maps.
- It's also possible to have only 1 target & more than 3. The limit before the game will crash is a total of 5 targets.
- Don't set the
King of the Hill targetmulti_object_markerFlag toPersistentor the mode won't work. - The only valid value for the
mp_teamproperty isNeutral.
Siege Targets
- Open a siege map in one tab, open a regular map with the same objects in another tab.
- Deep clone the siege target to the regular map.
- Move the added siege target to the exact same location as the existing matching object on the regular map.
- Disable all the gamemode flags for the added siege target except for "Spawn in Siege" including its children.
- Delete all the children of the siege targets (usually spawns that will be outside the map since they were deep cloned from the siege map), after they are all deleted make sure to "orphan children" of the child to ensure it doesn't have ghost children.
- Disable the
Spawn in siegeflag on the matching original map object. - You need to update
mp_levels.xtblso the map is selectable in siege. - Ensure the siege target and its child have the persistent flag.
- The
priorityproperty for theSiege targetchild determines which siege objects are unlocked to destroy, eg if you set it to1it would be the first target the attackers can destroy, you can have multiple targets unlocked by using the same number and if you wanted to have targets unlocked one at a time you would use1,2,3and so on. - You must use an existing string in the game for the
display_nameproperty on the child or the map will crash. - If you mess up the offset of the child the map will crash.
Backpack Racks
- Make sure you deep clone them when adding new racks, the child
Backpack rackis required for it to work properly. - Ensure that when moving the rack to a new location you only move the parent (the child will follow and be offset correctly), they will be named
Jetpackfor example if you're using the Terraform Patch. - When editing the child
backpack_typedetermines which backpack will spawn, most are the same as their in game names with the exception of FirepowerCommando& ConcussionShockwave. These names are frommp_backpacks.xtbl. - When editing the child you can change the number of backpacks on a rack, edit
num_backpacksand change it from a value ranging from 0-3, although 0 would mean the rack is empty and useless. - When editing the child it's possible to make it team exclusive, this means only the EDF or Red Faction can pickup backpacks from that rack during team game modes. Edit
mp_teamand enter eitherEDForGuerilla. In game that rack will have a green glow around it if your team can use it. - The
random_backpacksboolean in the object properties for theBackpack rackchild doesn't seem to do anything.
Capture the Flag targets
- The EDF and Red Faction have their own unique flag stand placed near their team spawns on regular multiplayer maps.
- Make sure you use deep cloning and only move the parent when placing or moving them so the child is offset correctly.
- Objects are called
edf_flag_stand.cchk_pc,guerrilla_flag_stand.cchk_pc. - If you attempt to add more than two stands to a map, the extra two will not work as capture points and only the asset will appear.
Neutralis not a valid value formp_team.- Changing the
Flag capture zoneFlags toPersistentwill break the capture points and only the asset will appear.
Bagman Objective Spawn
- Object is an
itemtype referencingitems.3d_xtbl. - Ignore the varying bounding box sizes when positioning the bag spawn, the XYZ axis position is what matters (the red, blue & green lines).
- The
respawnboolean doesn't do what you expect, the bag will still return to the original spawn point regardless if it's enabled or not. - You can't place more than one bag on a map, only one will spawn.
Weapon Spawns
- You should clone other weapons to add new ones, if you make them from scratch and don't get the bounding box correct for certain weapons it can cause duplicate weapon spawns in some cases.
weapon_typedetermines which weapon will spawn and referencesweapons.xtbl.- The
preplacedboolean needs more testing but you can disable weapons in certain game modes by disabling the game mode flags anyway. - The
respawnsboolean will cause the weapon to not re-spawn again during a match after it has been picked up for the first time.
Trigger Regions
- In multiplayer these are used to prevent the player from going out of bounds
region_kill_typecan be set to acliffor amine- In singleplayer the
trigger_flagscan be changed so the trigger isn't enabled during missions and/or activities. Eg.not_in_missionwill disable it during a main mission,not_in_activitywould disable it during a side activity andnot_in_mission not_in_activitywould disable it during both. - The
enabledboolean most likely allows mappers to enable/disable the region. This hasn't been tested at the time of writing however it's confirmed you can use flags to disable it during game modes
Maps with names different from their in-game names
- wc1 - Complex
- wc2 - Watchtower
- wc3 - Scrapheap
- wc4 - Vista
- wc5 - Fortress
- wc6 - Factory
- wc7 - Gulch
- wc8 - Cascade
- wc9 - Transmission
- wc10 - Pipeline
- wcdlc1 - Ruins
- wcdlc2 - Repercussion
- wcdlc3 - Imperial
- wcdlc4 - Expansion
- wcdlc5 - Frost
- wcdlc6 - Abandoned
- wcdlc7 - Stratosphere
- wcdlc8 - Invasion
- wcdlc9 - Nordic Bonus
- mpcx_crossover - Doubletime
- mpcx_assembly - Outpost
- mpdlc_landbridge - Equilibrium
- mpdlc_islands - Haven
- mpdlc_minibase - Complex
- mpdlc_overhang - Gradient
- mpdlc_ruins - Remnant
Maps with similar terrain
- Crash Site/Complex/Nordic Bonus
- Rift/Factory
- Remnant/Ruins
- Broadside/Invasion
- Wasteland/Gulch
- Outpost/Framework
- Radial/Transmission
- Sand Pit/Division/Watchtower
- Tutorial Area/Pipeline
- Pinnacle/Fortress
Misc Notes
- Most maps have
spawn_nodes&spectator_camerasas parents only however Excavation has some of them as children of backpack racks, the reason for this is unknown - Deep clone objects if you want to keep the children of an object and use regular clone if you just want to clone the parent. Only move the parent when deep cloning and the children will follow and be offset correctly
- If you see anything that looks like XML inside
layer_pcorrfgzone_pcfiles you can ignore that as we're 99% sure it's junk from their file packer reusing memory without zeroing it out. - Zone file format docs - Describes the zone format used by RFG in more detail
Localization strings
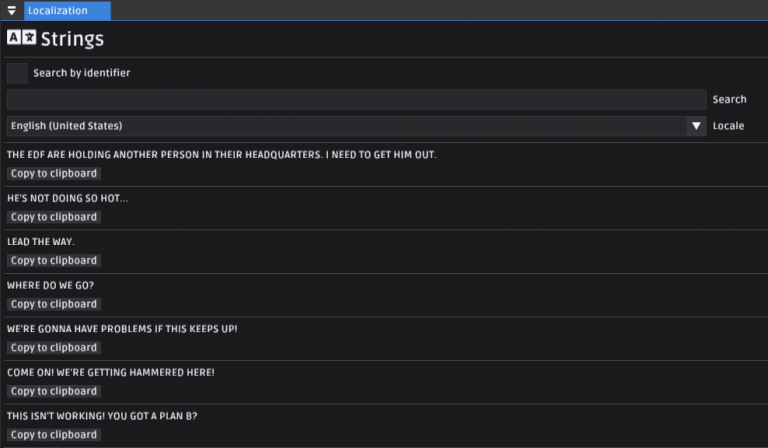
While Nanoforge is only in English at the moment it can view localized strings used by RFG. RFG uses placeholder strings in many xtbls which are replaced with their localization at runtime. These are shown automatically in the xtbl editor. You can also view a list of all localized strings via Tools > Localization > View localized strings. You can search by placeholder by checking "Search by identifier". You must fully enter the identifier without typos for this to work since it's comparing it to a hash of the identifier stored in the games localization files.
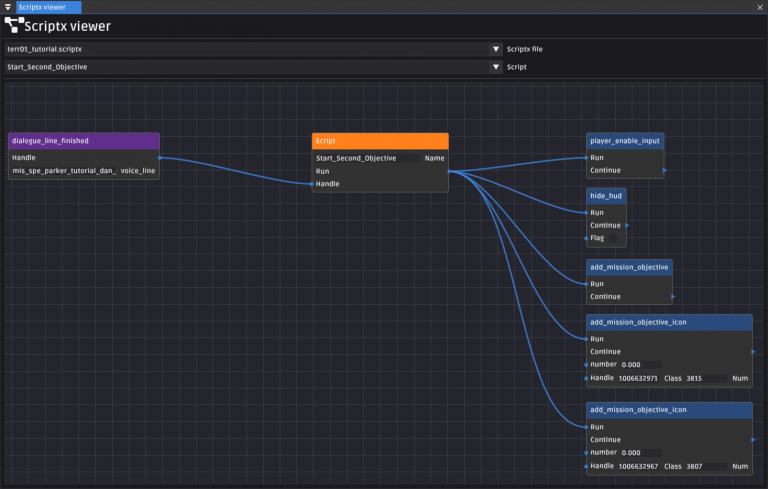
Scriptx viewer
RFG uses an xml based scripting system called scriptx for some mission logic. The viewer is an attempt at making it easier to read scriptx files which can be difficult to understand. It's a low priority feature so it likely won't see changes for a while but was enabled in case it's useful to people editing scriptx files. You still need to edit them by hand but it can help make it clearer what a script is doing. You can access it via View > Scriptx Viewer (WIP).
