Nanoforge Texture Editing: Difference between revisions
(Link Nanoforge basics page) |
(Remove note about mod packaging freeze, now has progress bar. List additional texture import restrictions. Add info about where to find some other types of textures and basic description of diffuse/specular/normal maps.) |
||
| Line 2: | Line 2: | ||
==Introduction== | ==Introduction== | ||
This tutorial shows how to edit loading screen textures for RFG using [[Nanoforge (Tool)|Nanoforge]]. The same steps can be used to edit any other | This tutorial shows how to edit loading screen textures for RFG using [[Nanoforge (Tool)|Nanoforge]]. The same steps can be used to edit any other texture. You can download the latest release [https://github.com/Moneyl/Nanoforge/releases on github]. Once downloaded unzip it and make sure the data path in Settings.xml is the path of your copy of RFG. See [[Nanoforge basics]] for an intro to some of its other features. | ||
==Create a project== | ==Create a project== | ||
| Line 45: | Line 45: | ||
====Texture restrictions==== | ====Texture restrictions==== | ||
* The width and height of textures imported into Nanoforge must be multiples of 4. This is a restriction for DXTn compressed textures. Most of RFGs textures are compressed using DXTn so Nanoforge applies this restriction for all imported textures. | * The width and height of textures imported into Nanoforge must be multiples of 4. This is a restriction for DXTn compressed textures. Most of RFGs textures are compressed using DXTn so Nanoforge applies this restriction for all imported textures. | ||
* Nanoforge only supports certain dds compression methods. When saving your dds make sure you use one of the following: BC1/DXT1, BC2/DXT3, or BC3/DXT5. When you save a dds with paint.NET or GIMP a window will pop up letting you change the compression method. In paint.NET it will be the first toggle in the window, in GIMP it will be labelled "Compression" | |||
* Nanoforge can only import dds files at the moment. Support for other common formats will be added in the future. | |||
====Importing==== | ====Importing==== | ||
| Line 50: | Line 52: | ||
[[File:Nanoforge_TextureImportExample.png|frameless|200px]] | [[File:Nanoforge_TextureImportExample.png|frameless|200px]] | ||
In this image I right clicked on <code>ui_loading_dust_0.tga</code> to get the context menu to display, then clicked <code>Replace...</code>. | |||
==Packaging your mod== | ==Packaging your mod== | ||
The final step of editing textures is to package your mod. Packaging generates a modinfo.xml file for the mod manager and updates any game files that were changed with your texture edits. To package your mod use <code>File > Package mod</code> on the main menu bar. | The final step of editing textures is to package your mod. Packaging generates a modinfo.xml file for the mod manager and updates any game files that were changed with your texture edits. To package your mod use <code>File > Package mod</code> on the main menu bar. Once packaging is done you can use your mod. To get the output go to the project folder you chose earlier and look inside it's <code>Output</code> folder. This should have a mod manager mod ready for use. Copy the files to a new folder in your mods folder and it should be visible in the mod manager and ready to go. | ||
==Additional info== | |||
This section includes some other info which may be useful when editing textures. | |||
===Where to find other textures=== | |||
====Characters==== | |||
You can find character meshes and textures in humans.vpp_pc. Most character textures are in the same str2_pc file as their meshes. | |||
====Weapons & other items==== | |||
You can find most weapons and other items like canisters in items.vpp_pc. Most item textures are in the same str2_pc file as their meshes. If they aren't they might be in item_containers.cpeg_pc, which is in items.vpp_pc. | |||
====Misc textures==== | |||
Many terrain and material textures can be found in terr01_precache.vpp_pc. Vehicle textures can be found in vehicles_r.vpp_pc and the equivalent dlc vpp_pc files. Building meshes can't be opened yet, but their textures can be. You can usually find building textures in the same str2_pc as their mesh. Building meshes have the .cchk_pc extension. | |||
===Diffuse, normal, and specular maps=== | |||
You might notice that many textures have 3 subtextures, ending with _s, _d, and _n. These are special textures used by the game for lighting. | |||
* Diffuse map: These are the textures ending with _d. They're the base color of the mesh used for lighting. | |||
* Specular map: These are the textures ending with _s. They're used to determine how reflective or shiny a mesh is. | |||
* Normal map: These are the textures ending with _n. They're used to make a meshes surface seem more detailed and interesting without needing huge polygon counts. | |||
Revision as of 23:30, 26 November 2020
 |
Tutorial: Nanoforge Texture Editing Prepared by Moneyl. |
Introduction
This tutorial shows how to edit loading screen textures for RFG using Nanoforge. The same steps can be used to edit any other texture. You can download the latest release on github. Once downloaded unzip it and make sure the data path in Settings.xml is the path of your copy of RFG. See Nanoforge basics for an intro to some of its other features.
Create a project
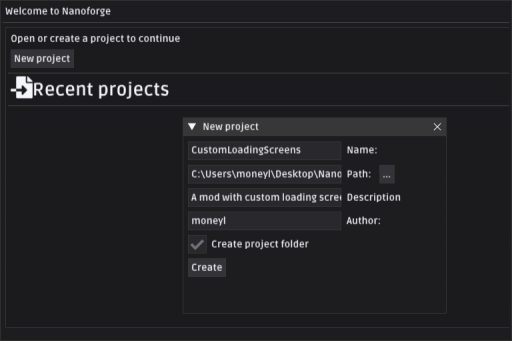
The first step of creating mods with Nanoforge is to create a project. A project tracks the changes made for a mod. You should create a different project for each mod. To do so, open Nanoforge and click the New project button. When you do you'll see the following popup.
- Name: The name of your mod. This is the name that your mod will show in the mod manager.
- Path: The folder path where you want to save your project files. I created a folder on my desktop called
Nanoforge Projectsfor this purpose for easy access. - Description: The description of your mod that's shown in the mod manager.
- Author: Your username, shown in the mod manager.
Finding textures
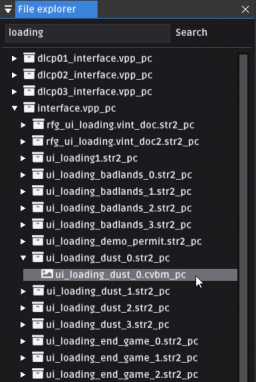
RFG texture files have either .cpeg_pc or .cvbm_pc as their file extension. These are identical. You can find and open textures with the file explorer. By default it's on the left side of the screen in Nanoforge. The file explorer lists the many vpp_pc and str2_pc files. These are comparable to zip files in purpose, but customized for the game for shorter loading times. You can click on vpp_pc and str2_pc files in the file explorer to see what files are inside of them.
The game has many files so you can use the search bar to narrow down the contents of the file explorer. By default it shows files with names that contain the search. So for example, if you were to enter mason into the search bar you'd see a few files related to the main character. If you only want to see one type of file you can prefix your search with an asterisk *. For example, if you search *.cvbm_pc it will show all files with the .cvbm_pc extension. Note that this won't show textures with the .cpeg_pc extension, so you'll need to do a separate search for those. Since we're looking for loading screen textures we'll search loading to narrow down our search. Interface.vpp_pc has some of the textures we're looking for. Find ui_loading_dust_0.cvbm_pc and double click it to continue.
Texture window
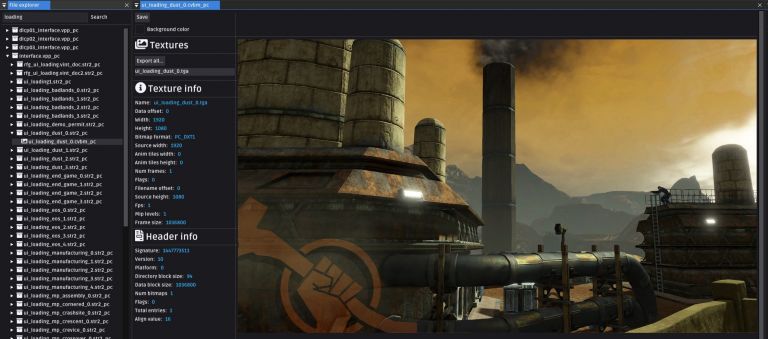
Once you open the texture you should see something like this. This texture file only has one subtexture, but they can contain many.
Things to note, from top to bottom:
- Save button: This will save any edits you've made to the texture in your project. If you close the texture window in Nanoforge without hitting save it won't edit the cpeg/cvbm. We'll be using this shortly.
- Export all: This will export all subtextures from the cpeg/cvbm to a folder of your choosing. This is useful when you're dealing a texture file with many subtextures. A few have over 100.
- Textures list: This is were subtextures are listed. You can right click on one to selectively export it or replace it with a new texture.
- Texture info: Info about the selected subtexture.
- Header info: General info about the cpeg/cvbm file.
Exporting
To export a subtexture right click it in the texture list and click Export. Alternatively, export all subtextures at once using the Export all button.
Editing
Nanoforge exports and imports textures as .dds files, so you'll need an image editor that supports them. Two free applications for this are Paint.NET and GIMP. I recommend Paint.NET if you're unfamiliar with computer graphics/editing as it's easier to use while still being powerful. This tutorial won't go over image editing specifically as there are many resources online for that. As a simple example we'll flip the image upside down. To do this in Paint.NET open the exported texture and use Image > Flip vertical on the main menu bar.
Once you're done editing resave the texture as a dds file. It's suggested that you use the same DXTn version listed in the texture info section of Nanoforge as "Bitmap format". For the example image we've been using that's DXT1. Paint.NET has a window that lets you change this when you save your dds. When you're editing keep in mind the restrictions below.
Texture restrictions
- The width and height of textures imported into Nanoforge must be multiples of 4. This is a restriction for DXTn compressed textures. Most of RFGs textures are compressed using DXTn so Nanoforge applies this restriction for all imported textures.
- Nanoforge only supports certain dds compression methods. When saving your dds make sure you use one of the following: BC1/DXT1, BC2/DXT3, or BC3/DXT5. When you save a dds with paint.NET or GIMP a window will pop up letting you change the compression method. In paint.NET it will be the first toggle in the window, in GIMP it will be labelled "Compression"
- Nanoforge can only import dds files at the moment. Support for other common formats will be added in the future.
Importing
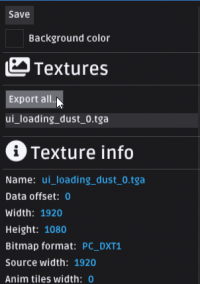
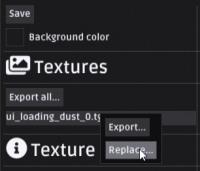
The next step is to import your edited texture into Nanoforge. To do this right click the subtexture you want to edit, click Replace..., and select your edited texture with the file browser that appears. If there are any import errors they'll show up in the log panel. The last step once you've imported your texture is to save your changes by clicking the Save button above the subtexture list. You need to click the save button for your changes to be preserved. To discard the changes close the texture window without clicking save.
In this image I right clicked on ui_loading_dust_0.tga to get the context menu to display, then clicked Replace....
Packaging your mod
The final step of editing textures is to package your mod. Packaging generates a modinfo.xml file for the mod manager and updates any game files that were changed with your texture edits. To package your mod use File > Package mod on the main menu bar. Once packaging is done you can use your mod. To get the output go to the project folder you chose earlier and look inside it's Output folder. This should have a mod manager mod ready for use. Copy the files to a new folder in your mods folder and it should be visible in the mod manager and ready to go.
Additional info
This section includes some other info which may be useful when editing textures.
Where to find other textures
Characters
You can find character meshes and textures in humans.vpp_pc. Most character textures are in the same str2_pc file as their meshes.
Weapons & other items
You can find most weapons and other items like canisters in items.vpp_pc. Most item textures are in the same str2_pc file as their meshes. If they aren't they might be in item_containers.cpeg_pc, which is in items.vpp_pc.
Misc textures
Many terrain and material textures can be found in terr01_precache.vpp_pc. Vehicle textures can be found in vehicles_r.vpp_pc and the equivalent dlc vpp_pc files. Building meshes can't be opened yet, but their textures can be. You can usually find building textures in the same str2_pc as their mesh. Building meshes have the .cchk_pc extension.
Diffuse, normal, and specular maps
You might notice that many textures have 3 subtextures, ending with _s, _d, and _n. These are special textures used by the game for lighting.
- Diffuse map: These are the textures ending with _d. They're the base color of the mesh used for lighting.
- Specular map: These are the textures ending with _s. They're used to determine how reflective or shiny a mesh is.
- Normal map: These are the textures ending with _n. They're used to make a meshes surface seem more detailed and interesting without needing huge polygon counts.
